Tech Tips Thursday
#1
 10-23-2014, 09:31 AM


Mark your backing plate to make it easy to see if it's rotating or not...
By Mike Phillips
Place a mark on your backing plate like this,

If you want to remove swirls and scratches the pad needs to rotate on the 5-6 speed setting when firm pressure is applied to the head of the polisher.
To make it easier for your eyes to detect if the pad is truly rotating or simply vibrating or jiggling, place a black mark using a Sharpie Permanent Marker onto the back of the backing plate.
If you have a black backing plate like the Meguiar's W68DA Backing Plate or the Edge DA Backing Plate, use a light fingernail polish or get a small bottle of white paint sold for painting car models.
By Mike Phillips
Place a mark on your backing plate like this,
If you want to remove swirls and scratches the pad needs to rotate on the 5-6 speed setting when firm pressure is applied to the head of the polisher.
To make it easier for your eyes to detect if the pad is truly rotating or simply vibrating or jiggling, place a black mark using a Sharpie Permanent Marker onto the back of the backing plate.
If you have a black backing plate like the Meguiar's W68DA Backing Plate or the Edge DA Backing Plate, use a light fingernail polish or get a small bottle of white paint sold for painting car models.
#2
10-30-2014, 02:56 PM
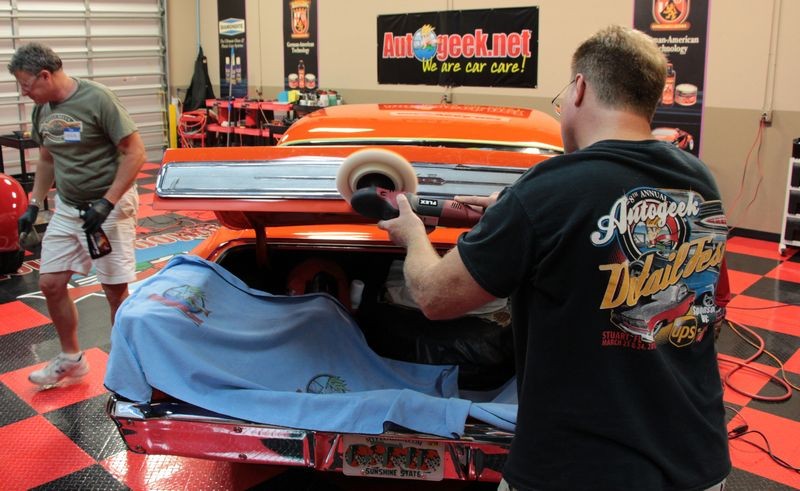
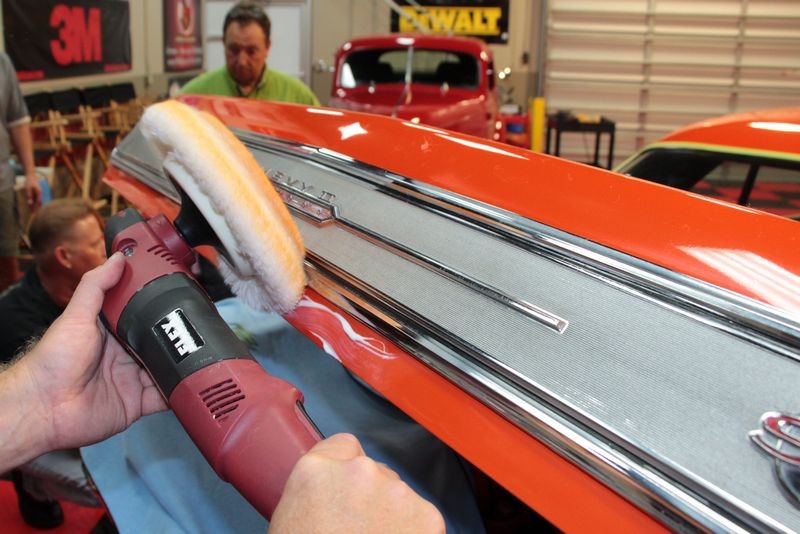
Best Practice - Avoid buffing on top of body lines and edges
By Mike Phillips
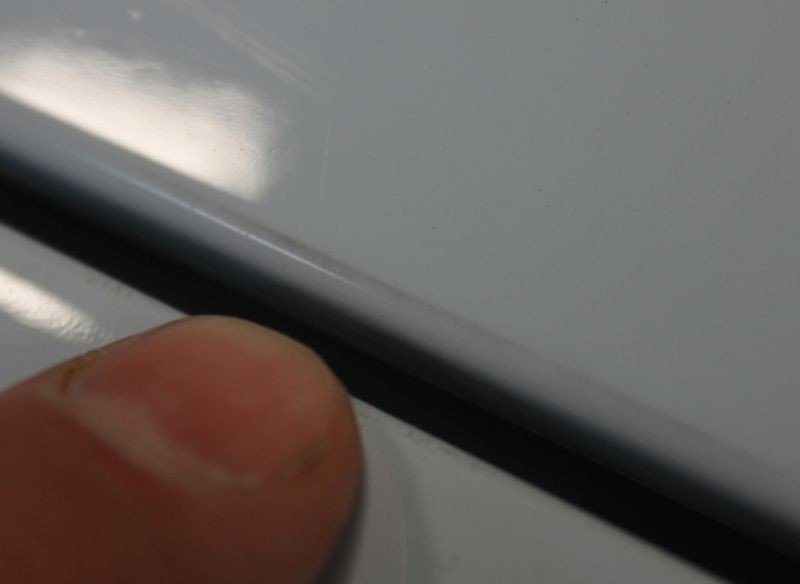
Buff up to body lines and edges but try not to buff directly on top of body lines and edges
A good best practice whenever you're machine cleaning is to buff up to hard body lines but don't buff on top of hard body lines. There are two reasons for this,
1. Paint tends to flow off high points a little after it's sprayed but before it's set-up, so paint will tend to be thinner on edges and body lines.
2. There will be increased pressure from your pad onto the paint because the body line or raised edge will be higher than the rest of the surrounding paint.
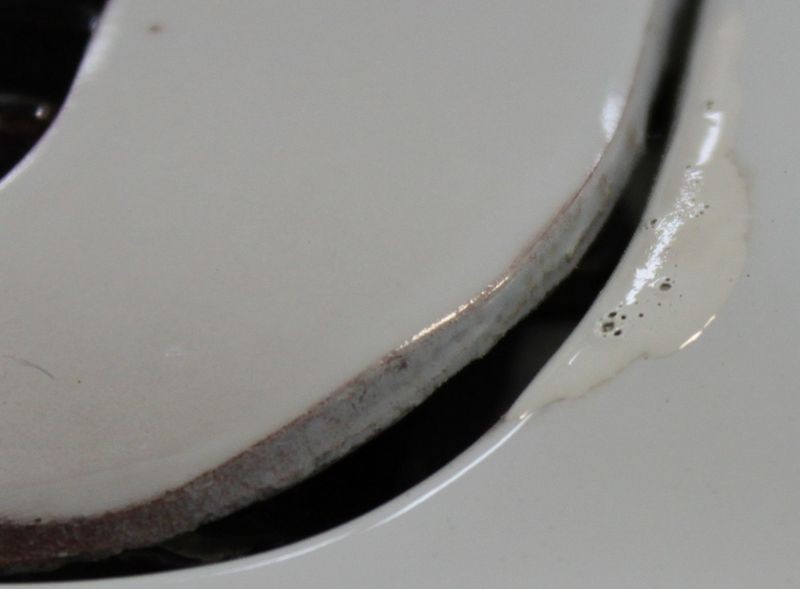
This is what can happen, if you look carefully at the hard body line on the hood of this VW you can see where someone has remove too much paint and exposed the primer under color coat. This is an older VW and has what appears to be a single stage finish but the principal behind avoiding buffing directly on top of an edge or hard body line still applies.
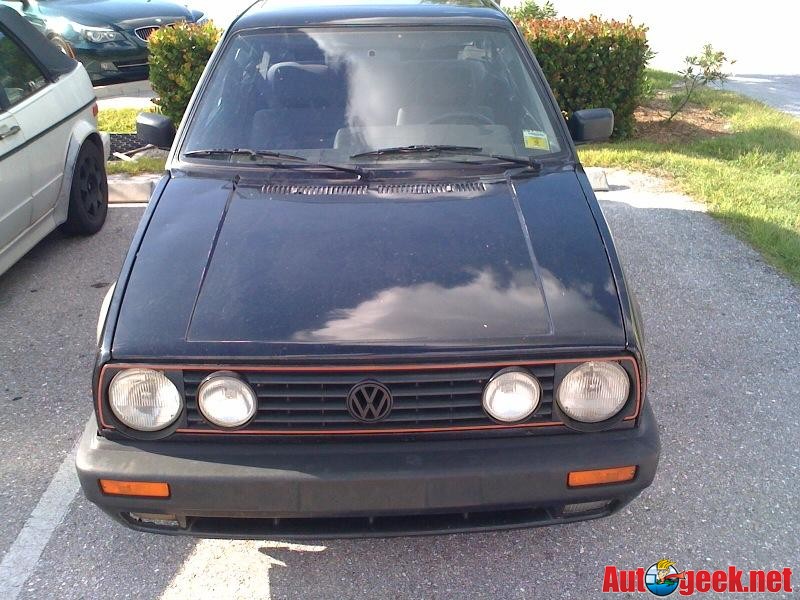
This is a little out of focus, sorry I was using my iphone...

As Benjamin Franklin once said, an ounce of prevention is worth a pound of cure.
A good best practice is to avoid buffing on top of hard body lines and edges and instead just buff up to them. You can also tape them off using thin painter's tape so in case you get your buffing pad close to the raised body line or edges you have a measure of extra protection.
This is where either slowing down and focusing on the task at hand comes into play or using smaller pads when working on thin panels.
Here at Autogeek we have a great selection of smaller buffing pads and backing plates as well as the Griot's Garage Professional Random Orbital 3 Inch Polisher for working thin panels.
Lake Country Beveled Edge 3.5 Inch Pad Pack

Griot's Garage 3 Inch Orange Polishing Foam Pad

Griot's Garage 3 Inch Mini Red Wax Pad

Griot's Garage Professional Random Orbital 3 Inch Polisher

2-3/4 inch Hook & Loop Rotary Backing Plate

D.A Adapter 5/8" X 11

Lake Country 4 Inch Low Profile Foam Pads

CCS 4 Inch Spot Buffs Foam Pads & Accessories

3.5" Dual Action Flexible Backing Plate

Rotary 3 � inch Backing Plate

By Mike Phillips
Buff up to body lines and edges but try not to buff directly on top of body lines and edges
A good best practice whenever you're machine cleaning is to buff up to hard body lines but don't buff on top of hard body lines. There are two reasons for this,
1. Paint tends to flow off high points a little after it's sprayed but before it's set-up, so paint will tend to be thinner on edges and body lines.
2. There will be increased pressure from your pad onto the paint because the body line or raised edge will be higher than the rest of the surrounding paint.
This is what can happen, if you look carefully at the hard body line on the hood of this VW you can see where someone has remove too much paint and exposed the primer under color coat. This is an older VW and has what appears to be a single stage finish but the principal behind avoiding buffing directly on top of an edge or hard body line still applies.
This is a little out of focus, sorry I was using my iphone...
As Benjamin Franklin once said, an ounce of prevention is worth a pound of cure.
A good best practice is to avoid buffing on top of hard body lines and edges and instead just buff up to them. You can also tape them off using thin painter's tape so in case you get your buffing pad close to the raised body line or edges you have a measure of extra protection.
This is where either slowing down and focusing on the task at hand comes into play or using smaller pads when working on thin panels.
Here at Autogeek we have a great selection of smaller buffing pads and backing plates as well as the Griot's Garage Professional Random Orbital 3 Inch Polisher for working thin panels.
Lake Country Beveled Edge 3.5 Inch Pad Pack
Griot's Garage 3 Inch Orange Polishing Foam Pad
Griot's Garage 3 Inch Mini Red Wax Pad
Griot's Garage Professional Random Orbital 3 Inch Polisher
2-3/4 inch Hook & Loop Rotary Backing Plate
D.A Adapter 5/8" X 11
Lake Country 4 Inch Low Profile Foam Pads
CCS 4 Inch Spot Buffs Foam Pads & Accessories
3.5" Dual Action Flexible Backing Plate
Rotary 3 � inch Backing Plate
#3
11-06-2014, 11:17 AM
The Beach Towel Tip
By Mike Phillips
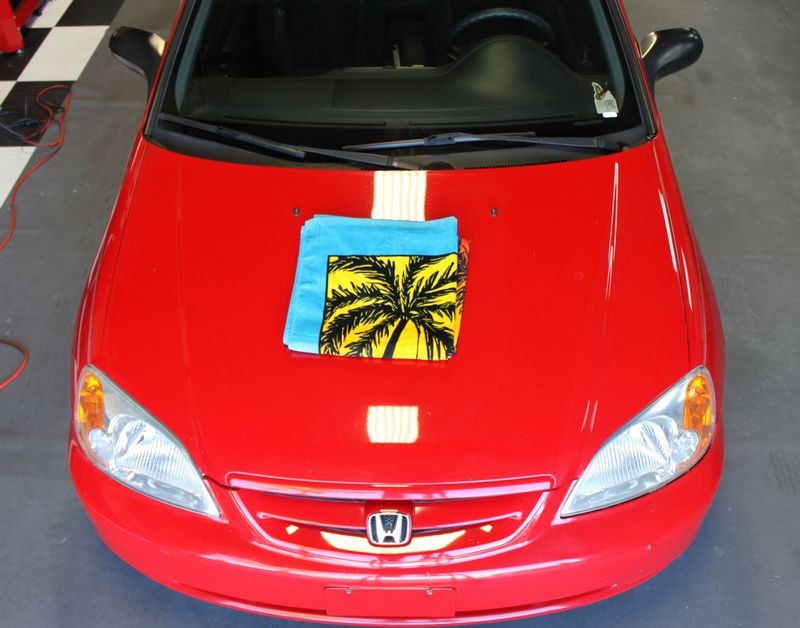
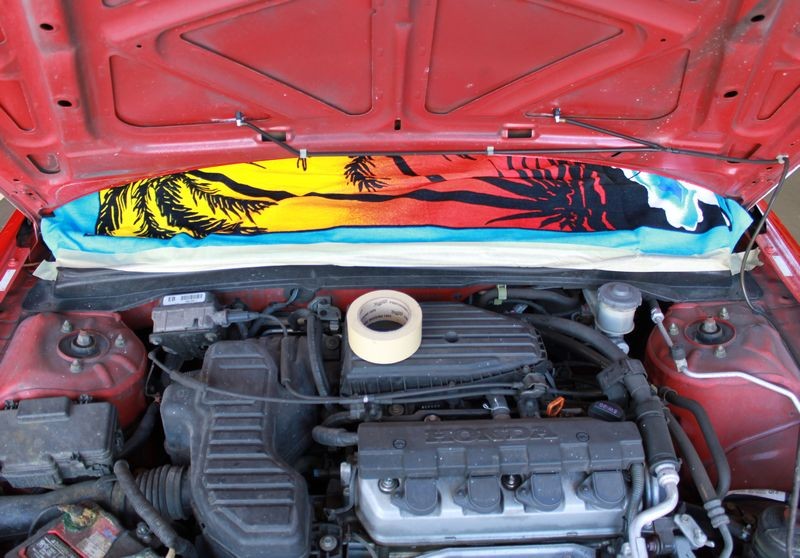
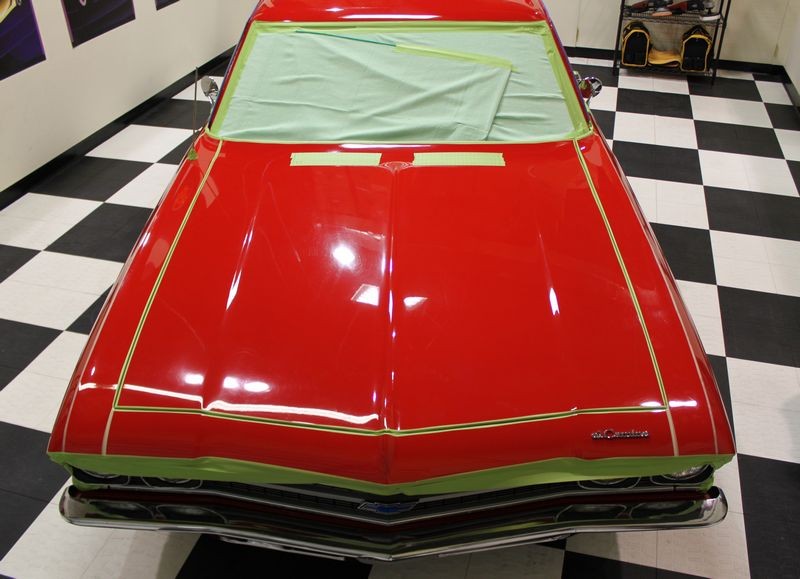
Here's a tip I use on some cars I detail to cover and protect the plastic surrounding the wiper arms at the back edge of the hood of cars, just before the windshield.
Beach Towels tend to be longer in one direction than the average bath towel; on average, beach towels run around 60" or 70" in length. Where this comes in handy over a bath towel is that your average car, truck or s.u.v. windshield is around 5' to 6' across so a Beach Towel is usually long enough to cover and protect the plastic, wiper arms, and glass in one fell swoop whereas the average bath towel falls short.
See if you can relate...
Sometimes it seems like splatter, that is the little white dots of product that land on the glass can be some of the hardest little things to remove 100%, not to mention time-consuming. So with this technique you can avoid the hassle entirely.
This tip is mostly for working with rotary buffers as they will tend to sling-out splatter more than machines like the Flex 3401, the Cyclo and DA Polishers like the Porter Cable.
I have seen people lift these other non-rotary buffers off hoods while the pad is still spinning at a high rate of speed and completely cover a windshield with splatter so it does happen. See these threads,
Here's a tip... don't lift the pad off the paint till you've turned the polisher off and the spinning pad has slowed down...
What not to do when detailing a car!
I know detailers that never tape-off or cover anything up and that's okay too, it's personal preference and it could be that you're just incredibly careful as well as incredibly good at this craft. It could also mean the cars you're working on it won't matter if you do get spatter into hard to detail areas.
For the rest us, here's how you use a Beach Towel to cover-up and protect areas you don't want to get splatter onto or into and then have to "detail" these areas and components later, after the polishing and waxing is over.
This is a stylish Beach Towel I found at Walgreens for around $6.00, my normal towel is white and ugly so I thought this would make for a more fun how-to article. Just to note you could also use paper or plastic, whatever works for you... I like Beach Towels for a number of reasons that paper and plastic don't offer but I have used both plastic, (2 mil painter's drop cloths), and paper, (usually newspaper but painter's masking paper works great too).

Here's the area I'm talking about that you want to cover up on modern cars, they often have plastic material with grill or vent openings that if you get splatter onto and into these areas it can be difficult and time consuming to remove.
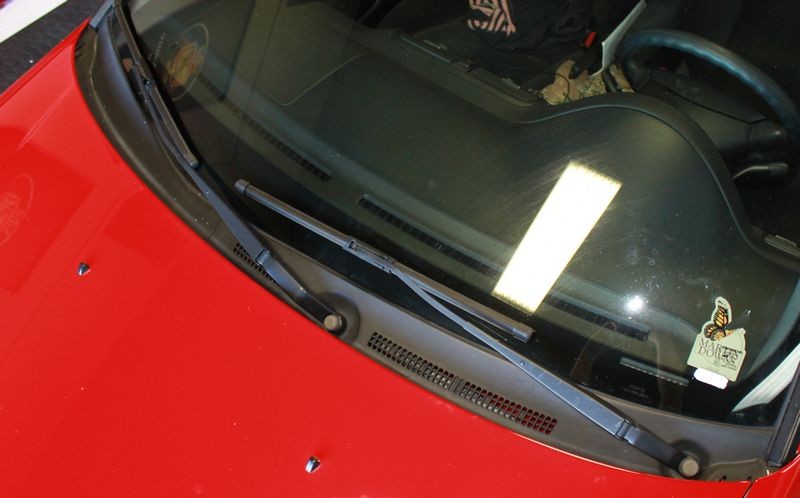
In most cases, if you're restoring the paint on someone's daily driver, not only is the paint neglected but the plastic is neglected meaning it's weathered, dried and dull and it seems like splatter really likes to stick hard to plastic in this condition.
If you do get splatter on these areas, it's also very unsightly and your customer might not appreciate it if you don't remove it. So with this technique, you never get splatter into and onto these areas in the first place. The old an ounce of prevention idea...
Not only does a Beach Towel work well for this type of job you can also re-wash it and use it again... so it's green technique...
Start by opening the hood and locating a place to tape one edge of the towel too, make sure the ends of the towel don't bind in the hinge mechanism and don't place dry cloth anywhere on a hot engine where it could be a fire danger or get caught into any moving parts. In other words, use common sense.
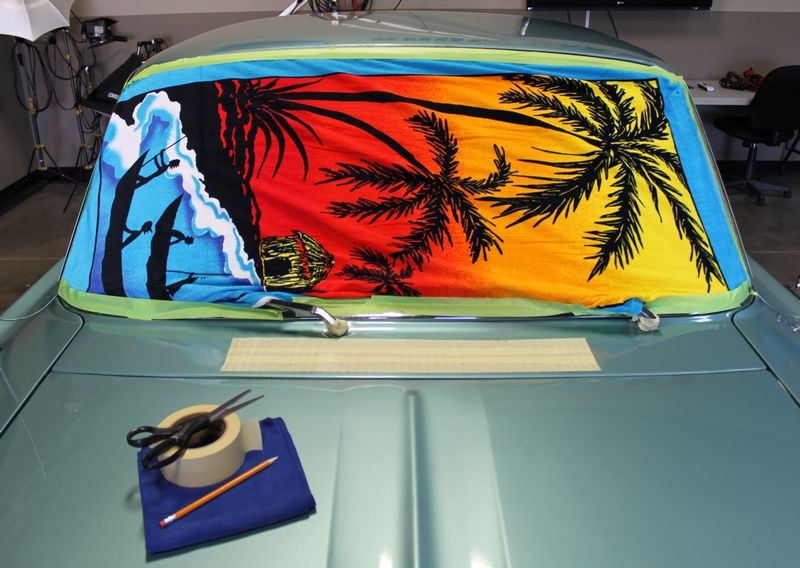
After carefully closing the hood, then use some Painter's Tape to affix the towel to the windshield so it doesn't fall down and if you're also taping off other plastic, vinyl or rubber trim, then tape-off these components accordingly.
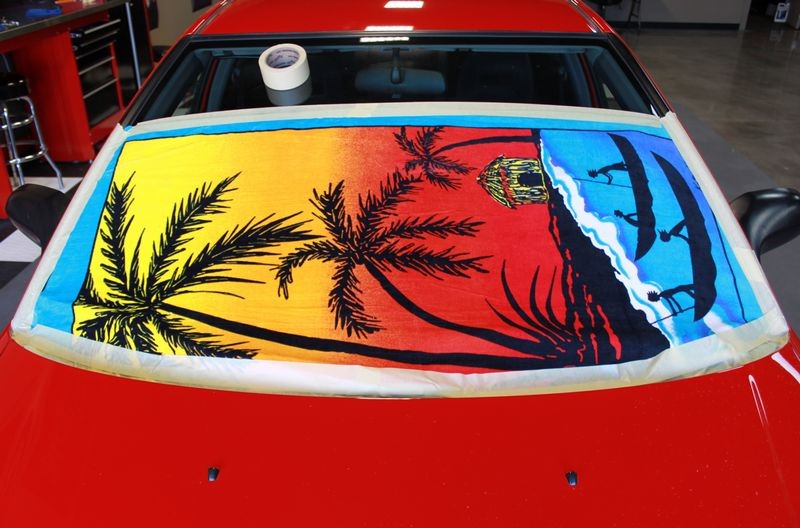
In this instance the towel did not reach all the way to the top of the windshield; this is okay however because the sling and splatter is mostly an issue for the lower portions adjacent to the hood where the buffing is taking place. You can also use this for the rear window. Side windows are not usually a problem for the glass because the panels are vertical.

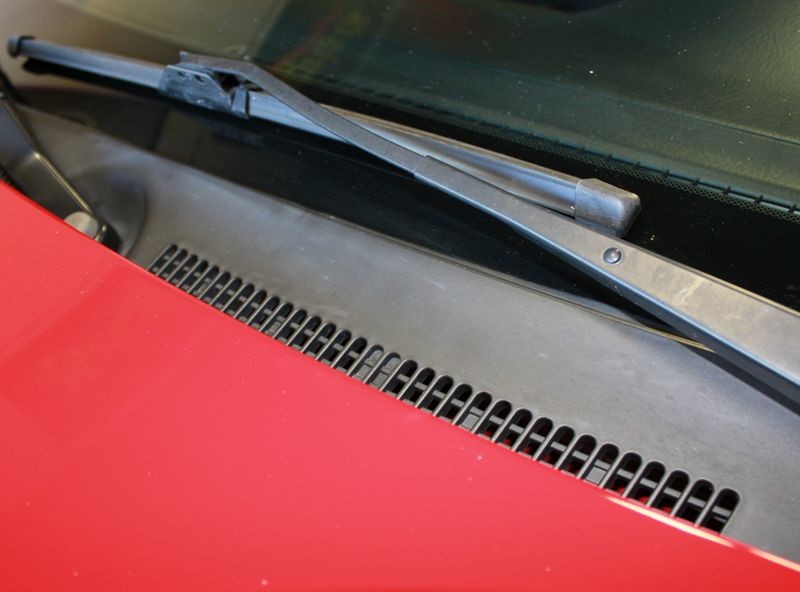
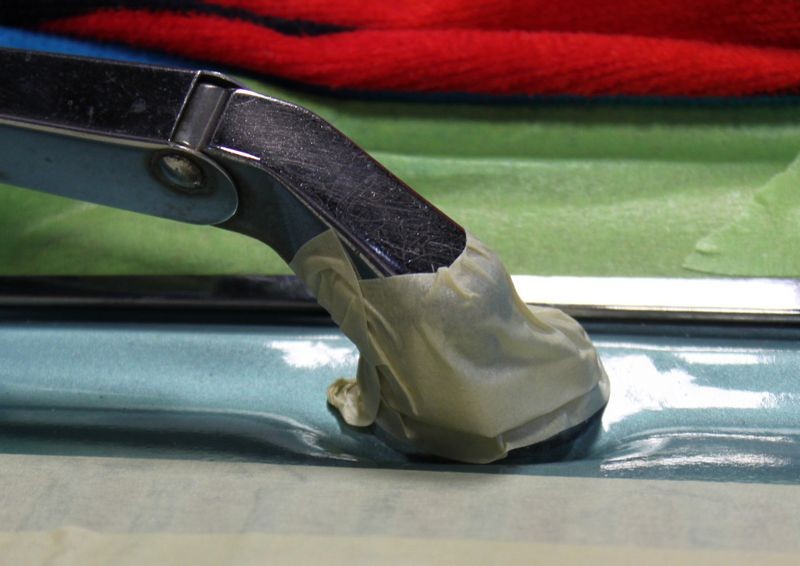
Notice how I've run a couple of strips of wide tape along where the Beach Towel meets the rear edge of the hood?


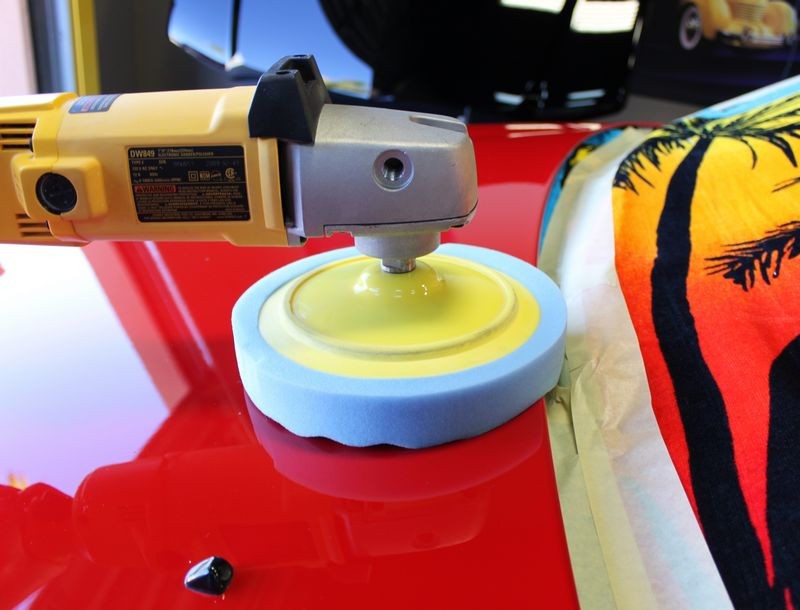
In some cases, the design of the vehicle means there's no gap or air space between the edge of the hood and the glass or wiper arm area, in these cases, you have to be careful when running your polisher not to run the buffing pad into the Beach Towel because the nap is grippy and your buffing pad could grab it and yank it into itself.
So for cars with a low or no air-gap between the paint and the area you're trying to cover up, being careful when buffing these areas is important, but I also run a couple of strips of tape across this area as a buffing pad that's lubricated with product will just bump into the tape, it won't snag it and possibly pull it off the area and into the pad.
Just an extra safety precaution, you can decide how DO or AR you want to get.
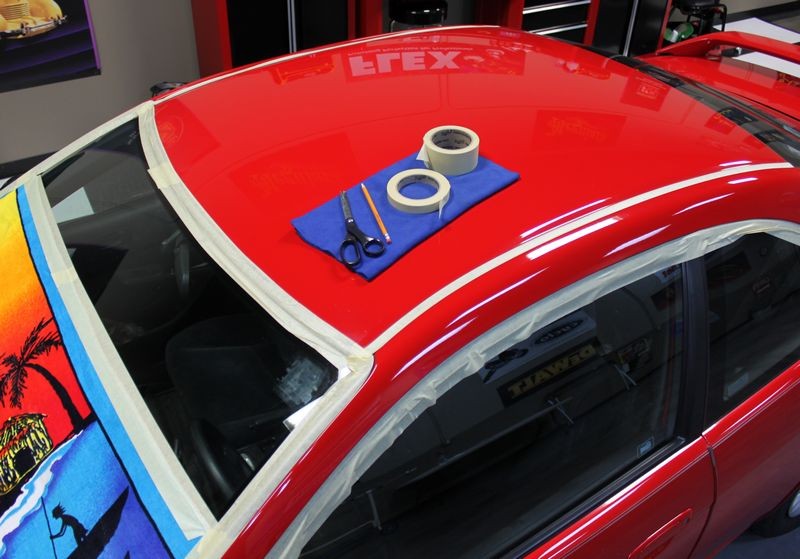
Then continue working around the car taping areas off you don't want to get compound or polish residue.
Classic and Antique Vehicles
For classic cars, there's usually zero plastic around the windshield, wiper arms and edge of hood but you may still want to cover-up the windshield glass so you can use the Beach Towel Tip for classics too...
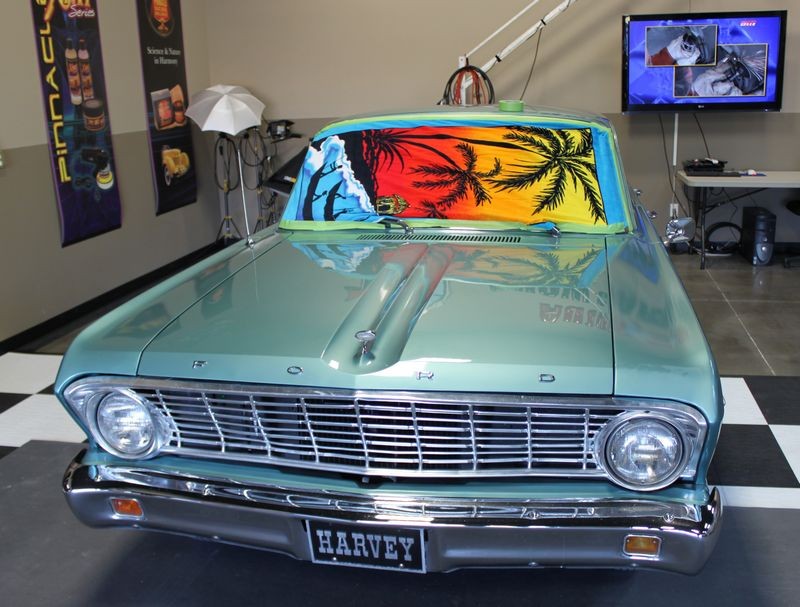
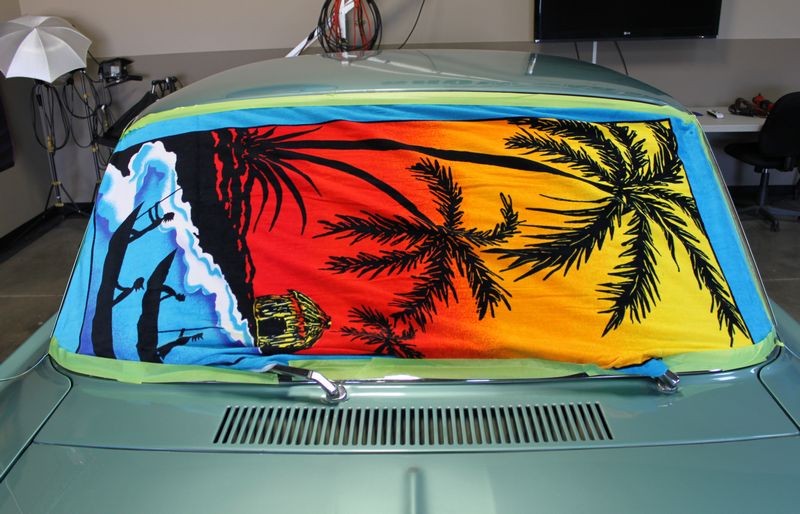
And of course... since most classics have air vent grills in front of the windshield, so Tape it off and avoid a lifetime of ugly...
And any other areas that you don't want to run a toothbrush or some kind of detailing brush...
"Polishing paint is polishing paint, detailing is getting the wax out of the cracks"
I've also used the extra large Guzzler Waffle Weave Drying Towels and while not always long enough to reach across 100% of a windshield, they do work as you can see in this thread,
Damp-Sanding Tools, Tips and Techniques by Mike Phillips
The Beach Towel Tip... simple and effective plus a real time saver...
On the Autogeek.net Store
Meguiars Professional Masking Tape Combo
3M Automotive Performance Masking Tape 3 Pack
The Ultimate Guzzler Waffle Weave By Cobra 28 x 44 inches
By Mike Phillips
Here's a tip I use on some cars I detail to cover and protect the plastic surrounding the wiper arms at the back edge of the hood of cars, just before the windshield.
Beach Towels tend to be longer in one direction than the average bath towel; on average, beach towels run around 60" or 70" in length. Where this comes in handy over a bath towel is that your average car, truck or s.u.v. windshield is around 5' to 6' across so a Beach Towel is usually long enough to cover and protect the plastic, wiper arms, and glass in one fell swoop whereas the average bath towel falls short.
See if you can relate...
Sometimes it seems like splatter, that is the little white dots of product that land on the glass can be some of the hardest little things to remove 100%, not to mention time-consuming. So with this technique you can avoid the hassle entirely.
This tip is mostly for working with rotary buffers as they will tend to sling-out splatter more than machines like the Flex 3401, the Cyclo and DA Polishers like the Porter Cable.
I have seen people lift these other non-rotary buffers off hoods while the pad is still spinning at a high rate of speed and completely cover a windshield with splatter so it does happen. See these threads,
Here's a tip... don't lift the pad off the paint till you've turned the polisher off and the spinning pad has slowed down...
What not to do when detailing a car!
I know detailers that never tape-off or cover anything up and that's okay too, it's personal preference and it could be that you're just incredibly careful as well as incredibly good at this craft. It could also mean the cars you're working on it won't matter if you do get spatter into hard to detail areas.
For the rest us, here's how you use a Beach Towel to cover-up and protect areas you don't want to get splatter onto or into and then have to "detail" these areas and components later, after the polishing and waxing is over.
This is a stylish Beach Towel I found at Walgreens for around $6.00, my normal towel is white and ugly so I thought this would make for a more fun how-to article. Just to note you could also use paper or plastic, whatever works for you... I like Beach Towels for a number of reasons that paper and plastic don't offer but I have used both plastic, (2 mil painter's drop cloths), and paper, (usually newspaper but painter's masking paper works great too).
Here's the area I'm talking about that you want to cover up on modern cars, they often have plastic material with grill or vent openings that if you get splatter onto and into these areas it can be difficult and time consuming to remove.
In most cases, if you're restoring the paint on someone's daily driver, not only is the paint neglected but the plastic is neglected meaning it's weathered, dried and dull and it seems like splatter really likes to stick hard to plastic in this condition.
If you do get splatter on these areas, it's also very unsightly and your customer might not appreciate it if you don't remove it. So with this technique, you never get splatter into and onto these areas in the first place. The old an ounce of prevention idea...
Not only does a Beach Towel work well for this type of job you can also re-wash it and use it again... so it's green technique...
Start by opening the hood and locating a place to tape one edge of the towel too, make sure the ends of the towel don't bind in the hinge mechanism and don't place dry cloth anywhere on a hot engine where it could be a fire danger or get caught into any moving parts. In other words, use common sense.
After carefully closing the hood, then use some Painter's Tape to affix the towel to the windshield so it doesn't fall down and if you're also taping off other plastic, vinyl or rubber trim, then tape-off these components accordingly.
In this instance the towel did not reach all the way to the top of the windshield; this is okay however because the sling and splatter is mostly an issue for the lower portions adjacent to the hood where the buffing is taking place. You can also use this for the rear window. Side windows are not usually a problem for the glass because the panels are vertical.
Notice how I've run a couple of strips of wide tape along where the Beach Towel meets the rear edge of the hood?
In some cases, the design of the vehicle means there's no gap or air space between the edge of the hood and the glass or wiper arm area, in these cases, you have to be careful when running your polisher not to run the buffing pad into the Beach Towel because the nap is grippy and your buffing pad could grab it and yank it into itself.
So for cars with a low or no air-gap between the paint and the area you're trying to cover up, being careful when buffing these areas is important, but I also run a couple of strips of tape across this area as a buffing pad that's lubricated with product will just bump into the tape, it won't snag it and possibly pull it off the area and into the pad.
Just an extra safety precaution, you can decide how DO or AR you want to get.
Then continue working around the car taping areas off you don't want to get compound or polish residue.
Classic and Antique Vehicles
For classic cars, there's usually zero plastic around the windshield, wiper arms and edge of hood but you may still want to cover-up the windshield glass so you can use the Beach Towel Tip for classics too...
And of course... since most classics have air vent grills in front of the windshield, so Tape it off and avoid a lifetime of ugly...
And any other areas that you don't want to run a toothbrush or some kind of detailing brush...
"Polishing paint is polishing paint, detailing is getting the wax out of the cracks"
I've also used the extra large Guzzler Waffle Weave Drying Towels and while not always long enough to reach across 100% of a windshield, they do work as you can see in this thread,
Damp-Sanding Tools, Tips and Techniques by Mike Phillips
The Beach Towel Tip... simple and effective plus a real time saver...
On the Autogeek.net Store
Meguiars Professional Masking Tape Combo
3M Automotive Performance Masking Tape 3 Pack
The Ultimate Guzzler Waffle Weave By Cobra 28 x 44 inches
#4
11-20-2014, 12:53 PM
How to remove dried bug spatter or bug guts
By Mike Phillips
Here's a tip I posted in 2005, the idea being to use the towel to hold the moisture onto the paint and thus the bug splatter where it can go to work softening and loosening the splatter. A large beach towel works well for this...
This was my Honda Pilot in our garage where I would also wash the garage because it's pretty hard to wash a car in the desert without the dry heat or the wind drying water before you can dry your car.
Take a wash rag and saturate it with water or your car wash solution.

Place the wet wash rag on top of the dried bug splatter and allow it to sit for a few minutes. A variation of this would be to use warm/hot water.

To speed up the process, apply some gentle pressure while drinking a cold soft drink and if need be, hum or whistle a little diddy.

A variation of the above but for a larger area would be to use a larger cloth such as a bath towel. Saturate a clean, soft 100% cotton towel with water and place it over the affected area.

Another variation for headlights and fenders...

Big Picture
The idea being to use some type of bath towel or microfiber towel or even wash cloth or wet chamois to trap and hold water onto the dried bug splatter in order to soften and re-liquefy it so you can more easily remove it without causing damage to the delicate, scratch-sensitive clear coat finish.

By Mike Phillips
Bug Spatter can actually eat through and remove paint if left on too long...
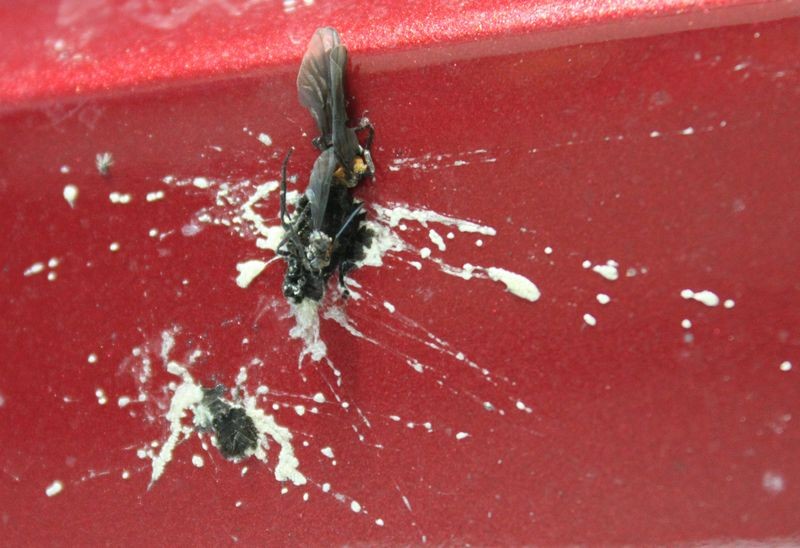
Tip: Water soften the dried bug guts and splatter with water first.
Trick: Use a towel to hold water in place on a vertical panel.
Trick: Use a towel to hold water in place on a vertical panel.
Here's a tip I posted in 2005, the idea being to use the towel to hold the moisture onto the paint and thus the bug splatter where it can go to work softening and loosening the splatter. A large beach towel works well for this...
This was my Honda Pilot in our garage where I would also wash the garage because it's pretty hard to wash a car in the desert without the dry heat or the wind drying water before you can dry your car.
Take a wash rag and saturate it with water or your car wash solution.
Place the wet wash rag on top of the dried bug splatter and allow it to sit for a few minutes. A variation of this would be to use warm/hot water.
To speed up the process, apply some gentle pressure while drinking a cold soft drink and if need be, hum or whistle a little diddy.
A variation of the above but for a larger area would be to use a larger cloth such as a bath towel. Saturate a clean, soft 100% cotton towel with water and place it over the affected area.
Another variation for headlights and fenders...
Big Picture
The idea being to use some type of bath towel or microfiber towel or even wash cloth or wet chamois to trap and hold water onto the dried bug splatter in order to soften and re-liquefy it so you can more easily remove it without causing damage to the delicate, scratch-sensitive clear coat finish.
#5
12-11-2014, 07:57 AM
Tips for working in warm/hot weather or direct sunlight
By Mike Phillips

First the facts...
Paint care products will always work best on a cool surface in the shade, this is true even for products that state they can be used in full sun. Even if a product can be used in full sun, working on a cool surface in the shade will always be easier and maximize the performance of the product because warm and/or hot temperatures, plus the heat from direct sun rays will always be trying to dry out your product before you can effectively work it over the surface.
Also, there's a HUGE difference between working in full sun in the morning in a fall or winter month and working in full sun when working in August, in Arizona at noon on a black car. The temperature of black paint in August, in Arizona at noon can easily exceed 180 degrees and any liquid product applied to the paint will tend to want to dry very quickly even if on the label it says, "can be used in the sun" .
A few tips...
For those times when you don't have shade and it's warm or hot outside and you don't have a cool surface to work on, here are a few tips...
Borrow some shade...
First, look around and see if you can borrow some shade, by this I mean the shade created by a large building? Maybe under a large tree?
Working under a tree can present a potential problem for debris falling out of the tree and on to your working surface but that's the trade-off for getting out of direct sun, so if you do work under a tree be sure to clean any panels immediately before working on them.
Portable Canopy...
If it's in your budget, invest in a quality EZ-Up type Canopy to create a shaded, protected work area.
Shrink your work area down to a smaller size...
Anytime a product becomes difficult to work with, one tip you can try is to shrink down the size of your work area. This means you spread the product out over a smaller area and only work this smaller area.
Be careful not to allow yourself to do what I call Buffer Creep. This is where you creep outward from your original small section and end up buffing out a larger section. Avoid Buffer Creep. Especially if your product appears to be drying up and becoming dusty.
Why a smaller area?
Because when you're working only a small are you're continually engaging the working film of product over the area more quickly as you move the polisher and by doing this there's less time for the product to dry and dust.
Clean your pads often or switch to a clean dry pad...
It's vitally important to work clean and this means cleaning your pad often and often can mean cleaning your pad after each Section Pass no matter which type of polisher you're using.
The warmer or hotter the temperatures and the worse the working conditions, then the more often you want to clean your pads.
Rotary Buffers
When cutting with a wool pad on a rotary buffer it really helps to have a pad washer, but if you don't have one you can get by with a Spur. When using foam pads you can use a pad washer or the "Cleaning your pad on the fly" technique" using a clean, terry cloth towel.
How to clean your foam pad on the fly
DA Polishers - Porter Cable - Meguiar's - Griot's
When cutting with a DA Polisher you can get by with "Cleaning your pad on the fly"
using a terry cloth towel, but a pad washer will clean a foam cutting pad better. Of course you can always switch to a new pad or a clean dry, used pad. The "Cleaning the pad on the fly technique" does not work with the Flex 3401 or the Cyclo Polisher. For these two types of polishers you'll need to use a pad washer, wash your pads by hand, or substitute clean new pads, or clean, dry used pads.
Keep in mind that anytime you us ANY product that abrades the paint, you will have two substances building up on the face of your pad,
Back when cars were painted with single stage paints, you could easily see the removed paint build up on the face of the pad because it was pigmented or colored. This would be a strong visual indicator to help remind you to clean your pads often.
With modern clear coats, you're still removing paint when you're abrading or doing correction work but because the clear layer is clear, it just doesn't show up as dramatically as single stage paint. The important point is to understand that clear paint is building up on the face of your pad and to clean our pad often.
You also want to wipe off any residue from the area worked before adding fresh product if you're going to work the area again.
Use an "ample" amount of product
When I say use an ample amount of product this means don�t use too much product and don�t use to little product.
From The Free Dictionary.com
Out of the above definitions, I'm using the 3rd definition.
Another option is to use a Pad Conditioner to lubricate and condition the surface of a dry pad, this will improve the buffing cycle and provide protection to the paint surface to help prevent micro-marring.
XMT Polishing Pad Conditioner
Cut down on the amount of product AFTER pad is broken-in...
After your pad is broken in with product, clean your pad after each section pass and when you apply fresh product you can cut down on the amount of product you actually apply to the face of your pad.
The key it to have enough product on the surface as you're working a section to have a film of product that you can see on the surface behind the polisher as you move the polisher in a direction.

Start before the sun comes up...
Do your machine compounding and polishing early in the morning when it's the coolest. Start setting up while it's still early in the morning while it's cool, then as soon as there's enough light to safely work, begin working the horizontal panels first. The reason for this is these will tend to get the hottest later in the day as the sun is over head making any correction or polishing work more difficult.
When it comes to the vertical panels, you can usually move the car in such a way that the side you're working on is shaded to some degree by placing the sun on the opposite side, thus the surface temperature of the panel will be cooler.
Use smaller, thinner pads
The 5.5" pads are thinner than the 6.5" pads and should rotate easily with a PC 7424XP, Griot's Garage and Meguiar's DA Polishers under on the 5.0 to 6.0 Speed setting. Together with working a smaller size section and ample product this will make working on a warm or hot surface easier.
Why to only work small sections at at time
The larger the area you work the more the product is going to dry up on you because while you're working one portion of the area, the portions not being worked will tend to start drying via evaporation. By shrinking your work area down, shrinking your pad size down and using ample product you'll better be able to maintain a wet buffing cycle over a smaller area.
Note: The larger the area you work the less abrading action each square inch of paint will get in relation to the time spent working the total area.
Exception to the rule...
While most instructions state to work a 2' x 2' area, when removing swirls in a warm or hot environment, it's usually more effective to work a smaller area.
I tend to stick around the 20" squarish area and even smaller if the paint is harder, the swirls are deeper and it's extremely hot and windy as the heat and the wind together will both act to force your product to dry more quickly.
Hope this helps....
By Mike Phillips
First the facts...
Paint care products will always work best on a cool surface in the shade, this is true even for products that state they can be used in full sun. Even if a product can be used in full sun, working on a cool surface in the shade will always be easier and maximize the performance of the product because warm and/or hot temperatures, plus the heat from direct sun rays will always be trying to dry out your product before you can effectively work it over the surface.
Also, there's a HUGE difference between working in full sun in the morning in a fall or winter month and working in full sun when working in August, in Arizona at noon on a black car. The temperature of black paint in August, in Arizona at noon can easily exceed 180 degrees and any liquid product applied to the paint will tend to want to dry very quickly even if on the label it says, "can be used in the sun" .
A few tips...
For those times when you don't have shade and it's warm or hot outside and you don't have a cool surface to work on, here are a few tips...
Borrow some shade...
First, look around and see if you can borrow some shade, by this I mean the shade created by a large building? Maybe under a large tree?
Working under a tree can present a potential problem for debris falling out of the tree and on to your working surface but that's the trade-off for getting out of direct sun, so if you do work under a tree be sure to clean any panels immediately before working on them.
Portable Canopy...
If it's in your budget, invest in a quality EZ-Up type Canopy to create a shaded, protected work area.
Shrink your work area down to a smaller size...
Anytime a product becomes difficult to work with, one tip you can try is to shrink down the size of your work area. This means you spread the product out over a smaller area and only work this smaller area.
Be careful not to allow yourself to do what I call Buffer Creep. This is where you creep outward from your original small section and end up buffing out a larger section. Avoid Buffer Creep. Especially if your product appears to be drying up and becoming dusty.
Why a smaller area?
Because when you're working only a small are you're continually engaging the working film of product over the area more quickly as you move the polisher and by doing this there's less time for the product to dry and dust.
Clean your pads often or switch to a clean dry pad...
It's vitally important to work clean and this means cleaning your pad often and often can mean cleaning your pad after each Section Pass no matter which type of polisher you're using.
The warmer or hotter the temperatures and the worse the working conditions, then the more often you want to clean your pads.
Rotary Buffers
When cutting with a wool pad on a rotary buffer it really helps to have a pad washer, but if you don't have one you can get by with a Spur. When using foam pads you can use a pad washer or the "Cleaning your pad on the fly" technique" using a clean, terry cloth towel.
How to clean your foam pad on the fly
DA Polishers - Porter Cable - Meguiar's - Griot's
When cutting with a DA Polisher you can get by with "Cleaning your pad on the fly"
using a terry cloth towel, but a pad washer will clean a foam cutting pad better. Of course you can always switch to a new pad or a clean dry, used pad. The "Cleaning the pad on the fly technique" does not work with the Flex 3401 or the Cyclo Polisher. For these two types of polishers you'll need to use a pad washer, wash your pads by hand, or substitute clean new pads, or clean, dry used pads.
Keep in mind that anytime you us ANY product that abrades the paint, you will have two substances building up on the face of your pad,
- Spent residue
- Removed paint
Back when cars were painted with single stage paints, you could easily see the removed paint build up on the face of the pad because it was pigmented or colored. This would be a strong visual indicator to help remind you to clean your pads often.
With modern clear coats, you're still removing paint when you're abrading or doing correction work but because the clear layer is clear, it just doesn't show up as dramatically as single stage paint. The important point is to understand that clear paint is building up on the face of your pad and to clean our pad often.
You also want to wipe off any residue from the area worked before adding fresh product if you're going to work the area again.
Use an "ample" amount of product
When I say use an ample amount of product this means don�t use too much product and don�t use to little product.
From The Free Dictionary.com
Out of the above definitions, I'm using the 3rd definition.
Using too much product
If you use too much you can hyper-lubricate the surface and this will make it more difficult for the abrasives to abrade the surface as they�ll tend to want to glide or slip over the surface instead of bite into the surface.
Using too little product
If you use too little product there won�t be enough lubrication to enable the buffing pad to rotate and thus engage the abrasives against the surface so they can bite into and remove small particles of paint.
You want an AMPLE amount of product when first starting out because you pad is dry and some of the product is going to seep into the pad leaving less on the surface to LUBRICATE and ABRADE the paint.If you use too much you can hyper-lubricate the surface and this will make it more difficult for the abrasives to abrade the surface as they�ll tend to want to glide or slip over the surface instead of bite into the surface.
Using too little product
If you use too little product there won�t be enough lubrication to enable the buffing pad to rotate and thus engage the abrasives against the surface so they can bite into and remove small particles of paint.
Another option is to use a Pad Conditioner to lubricate and condition the surface of a dry pad, this will improve the buffing cycle and provide protection to the paint surface to help prevent micro-marring.
XMT Polishing Pad Conditioner
Cut down on the amount of product AFTER pad is broken-in...
After your pad is broken in with product, clean your pad after each section pass and when you apply fresh product you can cut down on the amount of product you actually apply to the face of your pad.
The key it to have enough product on the surface as you're working a section to have a film of product that you can see on the surface behind the polisher as you move the polisher in a direction.
Start before the sun comes up...
Do your machine compounding and polishing early in the morning when it's the coolest. Start setting up while it's still early in the morning while it's cool, then as soon as there's enough light to safely work, begin working the horizontal panels first. The reason for this is these will tend to get the hottest later in the day as the sun is over head making any correction or polishing work more difficult.
When it comes to the vertical panels, you can usually move the car in such a way that the side you're working on is shaded to some degree by placing the sun on the opposite side, thus the surface temperature of the panel will be cooler.
Use smaller, thinner pads
The 5.5" pads are thinner than the 6.5" pads and should rotate easily with a PC 7424XP, Griot's Garage and Meguiar's DA Polishers under on the 5.0 to 6.0 Speed setting. Together with working a smaller size section and ample product this will make working on a warm or hot surface easier.
Why to only work small sections at at time
The larger the area you work the more the product is going to dry up on you because while you're working one portion of the area, the portions not being worked will tend to start drying via evaporation. By shrinking your work area down, shrinking your pad size down and using ample product you'll better be able to maintain a wet buffing cycle over a smaller area.
Note: The larger the area you work the less abrading action each square inch of paint will get in relation to the time spent working the total area.
Exception to the rule...
While most instructions state to work a 2' x 2' area, when removing swirls in a warm or hot environment, it's usually more effective to work a smaller area.
I tend to stick around the 20" squarish area and even smaller if the paint is harder, the swirls are deeper and it's extremely hot and windy as the heat and the wind together will both act to force your product to dry more quickly.
Hope this helps....
#6
01-08-2015, 04:52 PM
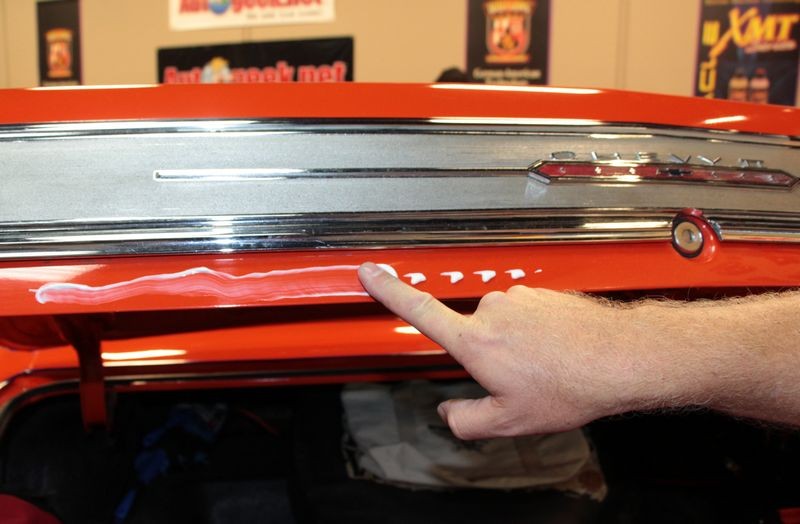
Finger Painting Technique when using a Rotary Buffer
By Mike Phillips
I call this Finger Painting - It's where you take your product spreader and spread out a thin layer of compound or polish to,
It's all about getting a film of compound or polish on the paint you're going to buff as this film of product not only contains the abrasives to abrade the paint but the film also lubricates the paint and especially the edges to help prevent burn-through.

You can also apply some compound or polish to the outer edges of the pad and work this product into the fibers, (or work it into the foam if using a foam pad), to moisten and lubricate the outside edge of the pad.
Like shown here,
Rotary Buffer Tip - Prime the side edges of foam cutting pads
Just be careful when turning the polisher on as centrifugal force will kick in and you can sling any excess product out of the pad and onto surrounding areas and even your eyes.
By Mike Phillips
I call this Finger Painting - It's where you take your product spreader and spread out a thin layer of compound or polish to,
A: Spread the product out over the section of paint to be buffed.
B: Lubricate the area being buffed.
Normally I use the 10 @ 10 Technique to lay down a bead of product directly onto the paint to be buffed but for tight areas like you see below, you want to lubricate the paint and even the pad because buffing out thin panels like this or buffing into tight areas will put a lot of cutting power into play.B: Lubricate the area being buffed.
It's all about getting a film of compound or polish on the paint you're going to buff as this film of product not only contains the abrasives to abrade the paint but the film also lubricates the paint and especially the edges to help prevent burn-through.
You can also apply some compound or polish to the outer edges of the pad and work this product into the fibers, (or work it into the foam if using a foam pad), to moisten and lubricate the outside edge of the pad.
Like shown here,
Rotary Buffer Tip - Prime the side edges of foam cutting pads
Just be careful when turning the polisher on as centrifugal force will kick in and you can sling any excess product out of the pad and onto surrounding areas and even your eyes.
#7
01-22-2015, 08:08 AM
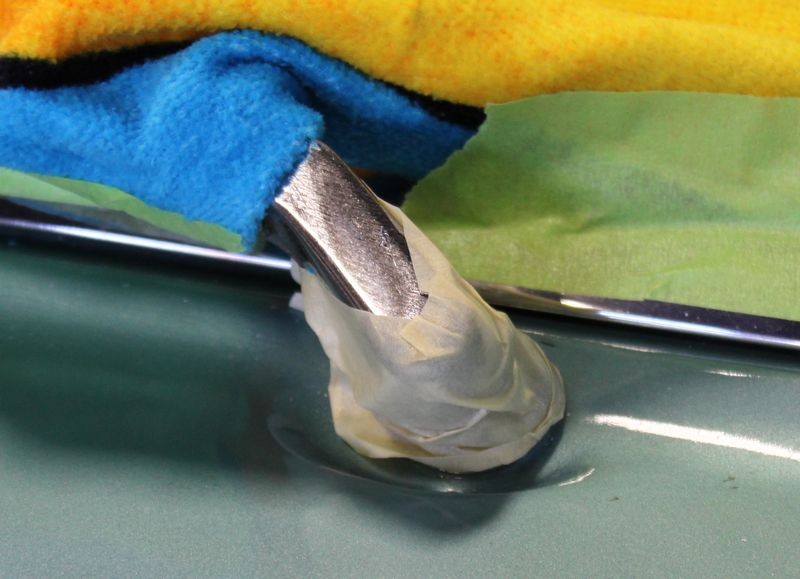
Tips on Taping Off Thin Paint and Chipped Paint
By Mike Phillips
When I first brought the 1970 Oldsmobile Cutlass to the shop I had originally planned to carefully Dampsand the paint to remove all the swirls and sanding scratches left by the other guy...
The first project I did was an article on how to restore and preserve antique and original vinyl tops using 303 products. As I worked on the top I became more familiar with the entire car and started to notice all the thin spots on raised body lines, corners and edges. I also found to blend lines.
To me these were indicators of trouble if a person were to attempt getting too aggressive with the correction process for the paint on this car, so i nixed sanding the paint and instead decided just to machine clean and polish the paint.
When CLOSELY inspecting the hood and front clip I found a number of places where the paint was buffed for too long and primer was either showing, of ghosting through and buffing in these areas will only remove more of the top coat exposing more of the primer underneath.
So to avoid doing more damage than has already been done I decided to carefully tape-off any areas with thin paint. In some places I was concerned that when I go to remove the tape, the adhesive on the tape may have more pulling strength over the adhesion of the paint to the panels, for this reason I chose to only tackle JUST the hood from beginning to end and then get the tape off the paint to reduce the potential for pulling paint off with the tape.
Short Time
Leaving the tape on for only a short time can help reduce the chance of pulling any good paint off the car in damaged areas. Another tip is to take your tape and before you apply it to the paint, place the adhesive side on your pant leg or on your shirt where the adhesive will pull off some fuzz or fiber particles and the effect this has is to reduce the stickiness of the tape. This is a little tip that can also help reduce the potential for pulling any paint off the car when pulling the tape off the car. Also be sure to pull the tape off at an angle, perpendicular to the panel and not straight up and off the panel.
Let's get started...
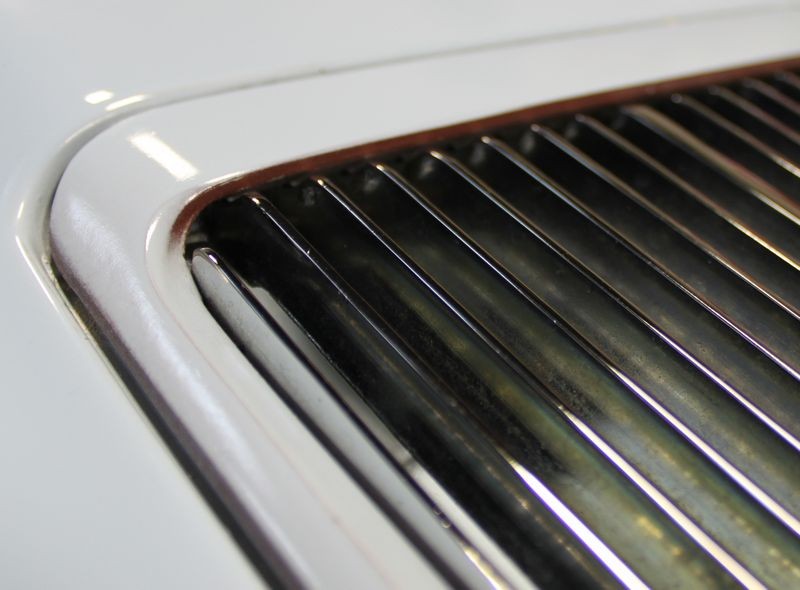
First the fresh air intake grills have a trim piece surrounding them with hard, sharp edges. There are a number of places someone else has already burned completely through the paint to expose both primer and sheet metal.

Here you can see bare metal and touch-up paint applied to where paint was chipped off.
Just down a ways from the above picture you can see where paint is lifting and chipping off... I don't want to get compound and polish residue in the seem surrounding the fresh air intake grill but I also don't want to pull off any paint when I pull off the tape.
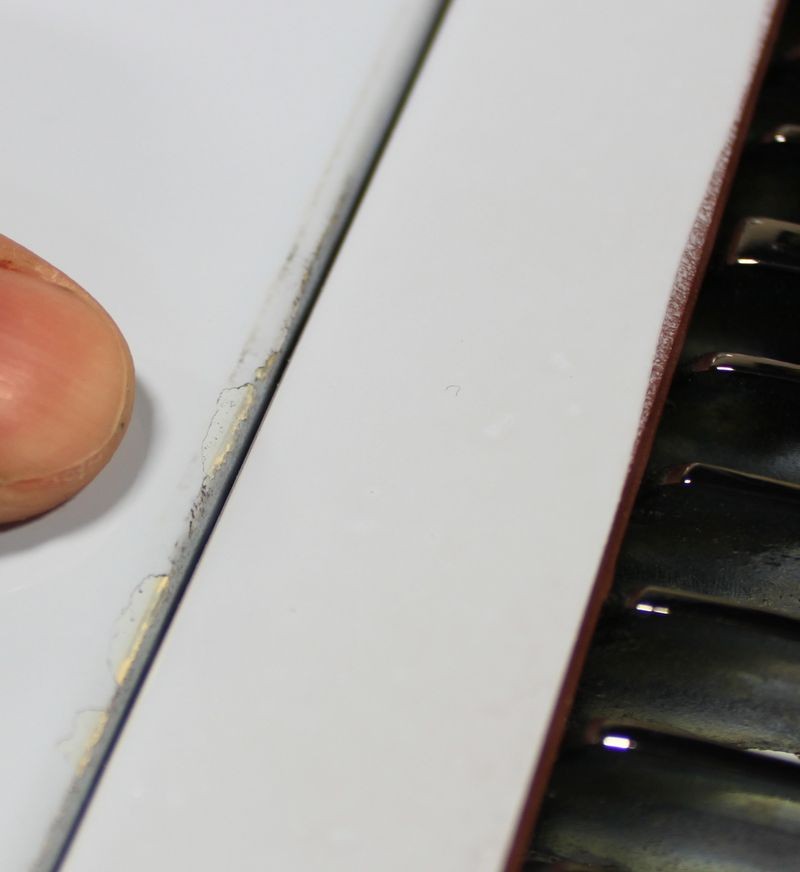
Here's another area where the paint has been buffed on too long with a rotary buffer and the result is the paint has been burned-through exposing both primer and bare metal.
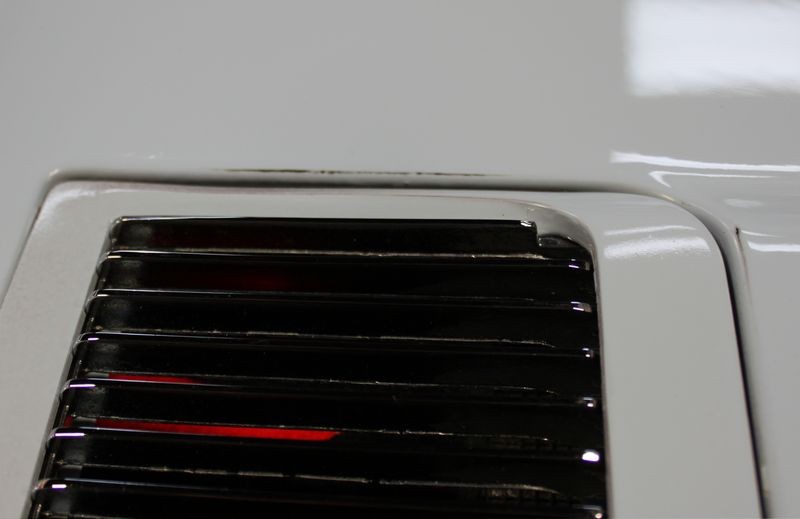
Same there here in on this edge close to the chrome fins that make up the grill.
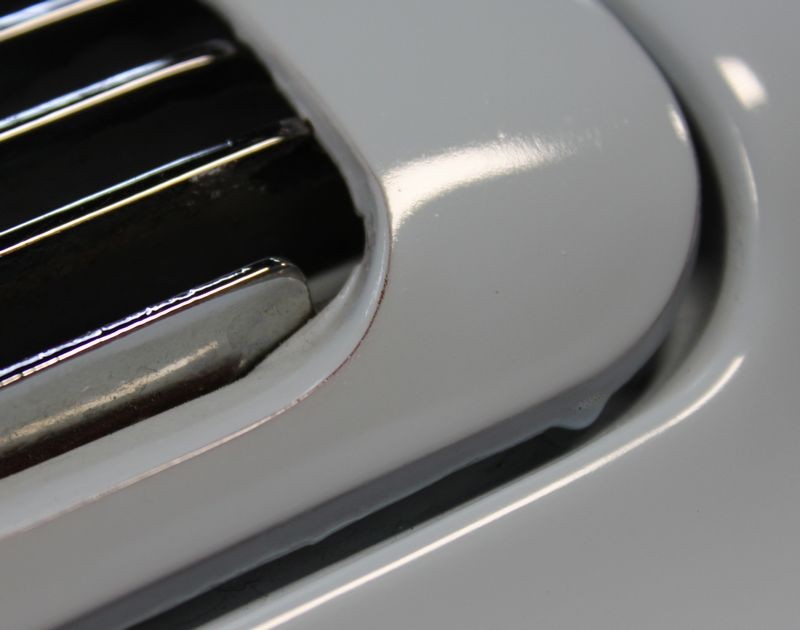
Here you can see where no paint was sprayed at all, just red primer. This is an indicator as to the quality of the paint job overall. Not a strong indicator, just something to Raise the Red Flag of Caution .
To be extra careful, I'm going to place the adhesive tape against my shirt a few times to attract some fuzz and fiber off the shirt and onto the adhesive thereby reducing it's stickiness and thus it's adhesive strength. This is called,
Burning the tape
For any place where paint is seen to be flaking or chipping off, I want to take some extra precautions.

Now I place the painters tape down and carefully work my way to cover all of the grill.

By Mike Phillips
When I first brought the 1970 Oldsmobile Cutlass to the shop I had originally planned to carefully Dampsand the paint to remove all the swirls and sanding scratches left by the other guy...
The first project I did was an article on how to restore and preserve antique and original vinyl tops using 303 products. As I worked on the top I became more familiar with the entire car and started to notice all the thin spots on raised body lines, corners and edges. I also found to blend lines.
To me these were indicators of trouble if a person were to attempt getting too aggressive with the correction process for the paint on this car, so i nixed sanding the paint and instead decided just to machine clean and polish the paint.
When CLOSELY inspecting the hood and front clip I found a number of places where the paint was buffed for too long and primer was either showing, of ghosting through and buffing in these areas will only remove more of the top coat exposing more of the primer underneath.
So to avoid doing more damage than has already been done I decided to carefully tape-off any areas with thin paint. In some places I was concerned that when I go to remove the tape, the adhesive on the tape may have more pulling strength over the adhesion of the paint to the panels, for this reason I chose to only tackle JUST the hood from beginning to end and then get the tape off the paint to reduce the potential for pulling paint off with the tape.
Short Time
Leaving the tape on for only a short time can help reduce the chance of pulling any good paint off the car in damaged areas. Another tip is to take your tape and before you apply it to the paint, place the adhesive side on your pant leg or on your shirt where the adhesive will pull off some fuzz or fiber particles and the effect this has is to reduce the stickiness of the tape. This is a little tip that can also help reduce the potential for pulling any paint off the car when pulling the tape off the car. Also be sure to pull the tape off at an angle, perpendicular to the panel and not straight up and off the panel.
Let's get started...
First the fresh air intake grills have a trim piece surrounding them with hard, sharp edges. There are a number of places someone else has already burned completely through the paint to expose both primer and sheet metal.
Here you can see bare metal and touch-up paint applied to where paint was chipped off.
Just down a ways from the above picture you can see where paint is lifting and chipping off... I don't want to get compound and polish residue in the seem surrounding the fresh air intake grill but I also don't want to pull off any paint when I pull off the tape.
Here's another area where the paint has been buffed on too long with a rotary buffer and the result is the paint has been burned-through exposing both primer and bare metal.
Same there here in on this edge close to the chrome fins that make up the grill.
Here you can see where no paint was sprayed at all, just red primer. This is an indicator as to the quality of the paint job overall. Not a strong indicator, just something to Raise the Red Flag of Caution .
To be extra careful, I'm going to place the adhesive tape against my shirt a few times to attract some fuzz and fiber off the shirt and onto the adhesive thereby reducing it's stickiness and thus it's adhesive strength. This is called,
Burning the tape
For any place where paint is seen to be flaking or chipping off, I want to take some extra precautions.
Now I place the painters tape down and carefully work my way to cover all of the grill.
#8
01-22-2015, 08:09 AM
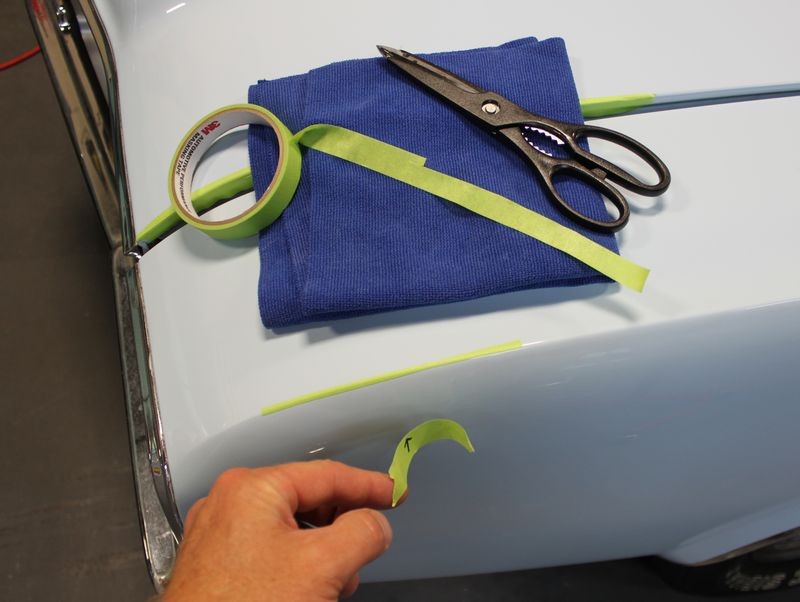
Someone asked me how to easily get the tape onto just the areas you want cover and my answer is you can make it as complicated as you want or as simple as you want. If you want to get complicated here's a simple tip, use a pencil to outline where you want to make your cut, (don't push hard on the tape or you might leave an imprint in the paint), then lift the tape up and back a little and make your cut.


In this shot I've taped off the fresh air intake grills and also laid out a taped-off section for the Reverse Test Spot .
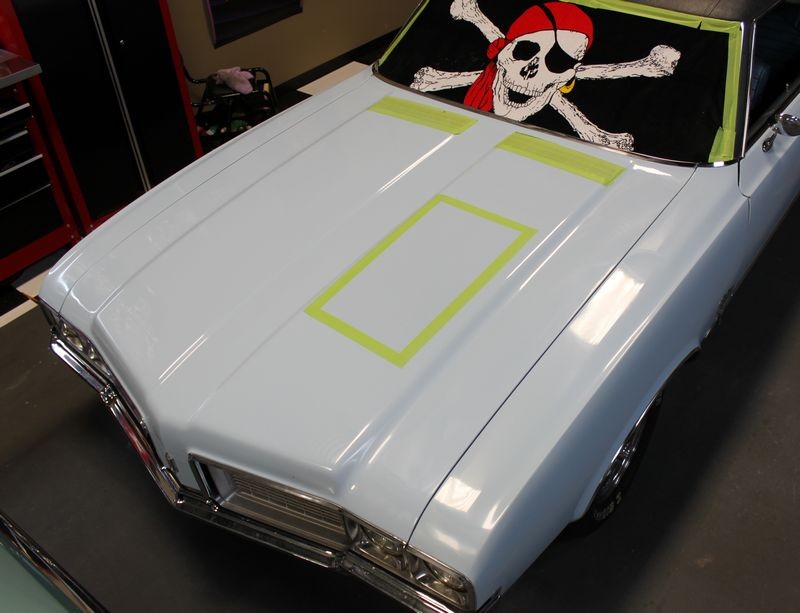
There are a number of places on the front clip where the paint has been burned-through. Buffing on them just a little will cause the burn-through area to creep or enlarge, so I don't want to be responsible for burn-through-creep so I'm going to carefully tape these areas off.

First I open the door, this makes it easier to tape this area off and actually when I'm buffing this area I'll have the door open too.


Here's a thin spot along the hood edge...
You can place some tape on the adjacent panel as a marker so you don't forget about it as you buff this area...


Or tape the edge off, I chose to tape the edge off by opening the hood, taping the area, then folding the tape down the side of the hood.

Just out from the edge of the hood there's a thin spot on the raised body line of the front driver's side fender. This is a COMMON place to find burn-through paint as detailers tend to buff the easy panels too much, easy being the horizontal panels here it's easy to stand their and run the polisher.
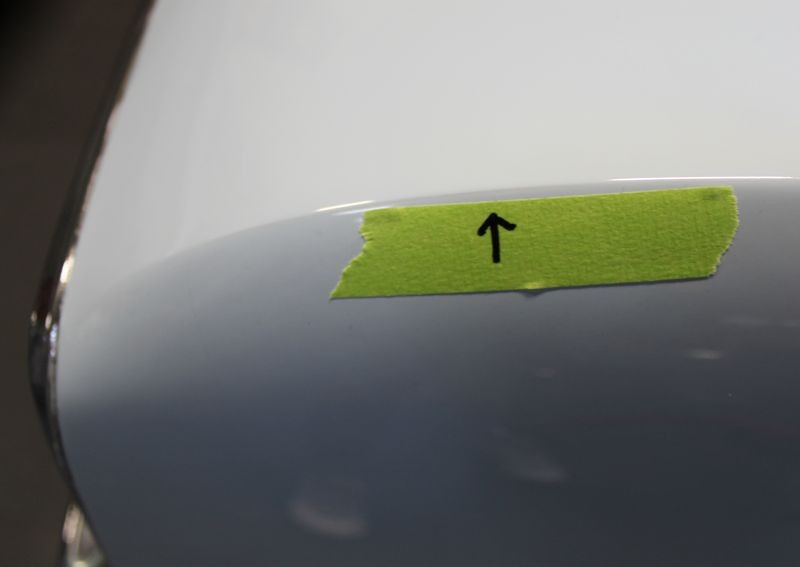
If you don't have thin tape you can make thin tape to enable you to only cover the part you want to protect.

Then remove your marker or leave it there as you're buffing the top, the idea being not to forget about thin areas and buff on them too long.
Open doors, hood and trunk lid tip
When it comes to classics, a lot of time the body panels don't line up perfectly and you'll have one edge of a panel higher or lower than an adjacent panel. for these situations you can open the hood, doors or trunk lid and then carefully buff the panel in a way that you can safely buff on the paint without the risk of at the same time buffing on an edge that would be higher if the hood, door, or trunk lid were closed.
Along the edge where the hood meets the fender there are places where the hood is higher and also lower than the edge of the fender. By raising the hood just a little I can buff on the hood without also having the buffing pad touching, or buffing on the fender.
If I open the hood higher, (and cover the engine compartment to protect it from splatter), I can then buff the edge of the fender without having the buffing pad touching or buffing on the hood.
This takes a little more time but will help you from leaving your Signature on the car.
Signature = Mistake
See this article,
Your Signature - Don't leave one...
In this shot I've taped off the fresh air intake grills and also laid out a taped-off section for the Reverse Test Spot .
There are a number of places on the front clip where the paint has been burned-through. Buffing on them just a little will cause the burn-through area to creep or enlarge, so I don't want to be responsible for burn-through-creep so I'm going to carefully tape these areas off.
First I open the door, this makes it easier to tape this area off and actually when I'm buffing this area I'll have the door open too.
Here's a thin spot along the hood edge...
You can place some tape on the adjacent panel as a marker so you don't forget about it as you buff this area...
Or tape the edge off, I chose to tape the edge off by opening the hood, taping the area, then folding the tape down the side of the hood.
Just out from the edge of the hood there's a thin spot on the raised body line of the front driver's side fender. This is a COMMON place to find burn-through paint as detailers tend to buff the easy panels too much, easy being the horizontal panels here it's easy to stand their and run the polisher.
If you don't have thin tape you can make thin tape to enable you to only cover the part you want to protect.
Then remove your marker or leave it there as you're buffing the top, the idea being not to forget about thin areas and buff on them too long.
Open doors, hood and trunk lid tip
When it comes to classics, a lot of time the body panels don't line up perfectly and you'll have one edge of a panel higher or lower than an adjacent panel. for these situations you can open the hood, doors or trunk lid and then carefully buff the panel in a way that you can safely buff on the paint without the risk of at the same time buffing on an edge that would be higher if the hood, door, or trunk lid were closed.
Along the edge where the hood meets the fender there are places where the hood is higher and also lower than the edge of the fender. By raising the hood just a little I can buff on the hood without also having the buffing pad touching, or buffing on the fender.
If I open the hood higher, (and cover the engine compartment to protect it from splatter), I can then buff the edge of the fender without having the buffing pad touching or buffing on the hood.
This takes a little more time but will help you from leaving your Signature on the car.
Signature = Mistake
See this article,
Your Signature - Don't leave one...
#9
01-29-2015, 12:48 PM
How to buff off an edge when using a rotary buffer
By Mike Phillips

***Proactive Preface***
When I say,
buff off an edge
I don't mean remove the paint off the edge but instead how to best hold the polisher when moving a spinning pad over an edge to reduce the risk of causing harm to the edge and to prevent the spinning pad from grabbing the edge and yanking your grip on the rotary buffer potentially causing you, the paint or the car harm.
I know there's a lot of persnickety fellers out there that like to twist words on purpose for their own nefarious reasons so this first paragraph is to ensure anyone that can read and think understands the context of the title. I never mind helping those that are easily and/or willfully confused. :laughing:
Now let's move on to the how-to part...
How to buff off and edge when using a rotary buffer
This is kind of tricky to type about but here goes. First it�s always a good best practice to not buff directly on top of an edge. This is because paint tends to be thinner on high points as it flows downward due to gravity plus there�s always the possibility that some other detailer has buffed the car out before you and doesn�t practice the best practice.
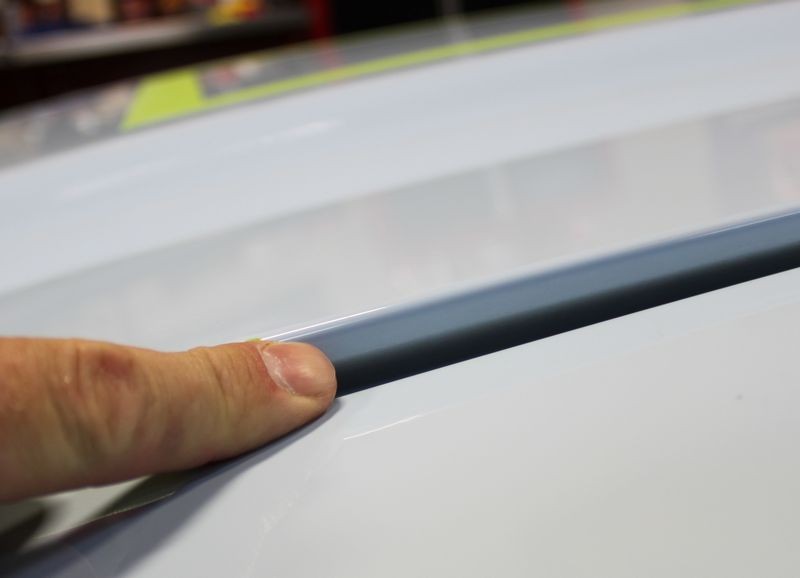
It�s also a good best practice to hold the pad flat to the surface and not hold the pad at an angle so you�re only using a portion of the pad on edge. That said, sooner or later all panels come to an end at the end of the panel is an edge. Your goal is to buff the paint up to the edge but not buff with firm pressure directly on top of the edge.
When your rotary buffer is turned on and you�re looking down on the back of the buffing pad and backing plate, the pad spins in a clockwise rotation. You need to understand the relationship between the direction the buffing pad is rotating and the way you run the pad next to an edge.
You want the pad touching down in a way that the pad is rotating over and off the edge, not rotating into the edge. See the pictures below as I think they will do a better job of showing you what to do and what not to do.
Right Technique
In these pictures the body of the rotary buffer is held in a way so that when the pad is spinning it is buffing or rotating OFF the edge.
Wrong Technique
In these pictures the body of the rotary buffer is held in a way so that when the pad is spinning it is buffing or rotating INTO the edge.


Make sense?
A good way to really understand what it means to buff off an edge or to buff into an edge is to get a junker panel or a beater car that no one cares about and PURPOSEFULLY perform both the correct and incorrect technique.
The technique will make complete sense immediately when you try to buff into and edge.
By Mike Phillips
Correctly buffing off an edge...
***Proactive Preface***
When I say,
buff off an edge
I don't mean remove the paint off the edge but instead how to best hold the polisher when moving a spinning pad over an edge to reduce the risk of causing harm to the edge and to prevent the spinning pad from grabbing the edge and yanking your grip on the rotary buffer potentially causing you, the paint or the car harm.
I know there's a lot of persnickety fellers out there that like to twist words on purpose for their own nefarious reasons so this first paragraph is to ensure anyone that can read and think understands the context of the title. I never mind helping those that are easily and/or willfully confused. :laughing:
Now let's move on to the how-to part...
How to buff off and edge when using a rotary buffer
This is kind of tricky to type about but here goes. First it�s always a good best practice to not buff directly on top of an edge. This is because paint tends to be thinner on high points as it flows downward due to gravity plus there�s always the possibility that some other detailer has buffed the car out before you and doesn�t practice the best practice.
It�s also a good best practice to hold the pad flat to the surface and not hold the pad at an angle so you�re only using a portion of the pad on edge. That said, sooner or later all panels come to an end at the end of the panel is an edge. Your goal is to buff the paint up to the edge but not buff with firm pressure directly on top of the edge.
When your rotary buffer is turned on and you�re looking down on the back of the buffing pad and backing plate, the pad spins in a clockwise rotation. You need to understand the relationship between the direction the buffing pad is rotating and the way you run the pad next to an edge.
You want the pad touching down in a way that the pad is rotating over and off the edge, not rotating into the edge. See the pictures below as I think they will do a better job of showing you what to do and what not to do.
Right Technique
In these pictures the body of the rotary buffer is held in a way so that when the pad is spinning it is buffing or rotating OFF the edge.
Wrong Technique
In these pictures the body of the rotary buffer is held in a way so that when the pad is spinning it is buffing or rotating INTO the edge.
Make sense?
A good way to really understand what it means to buff off an edge or to buff into an edge is to get a junker panel or a beater car that no one cares about and PURPOSEFULLY perform both the correct and incorrect technique.
The technique will make complete sense immediately when you try to buff into and edge.
#10
02-05-2015, 01:47 PM
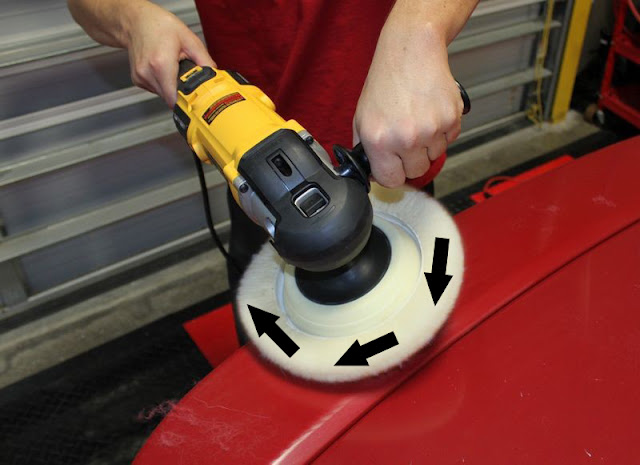
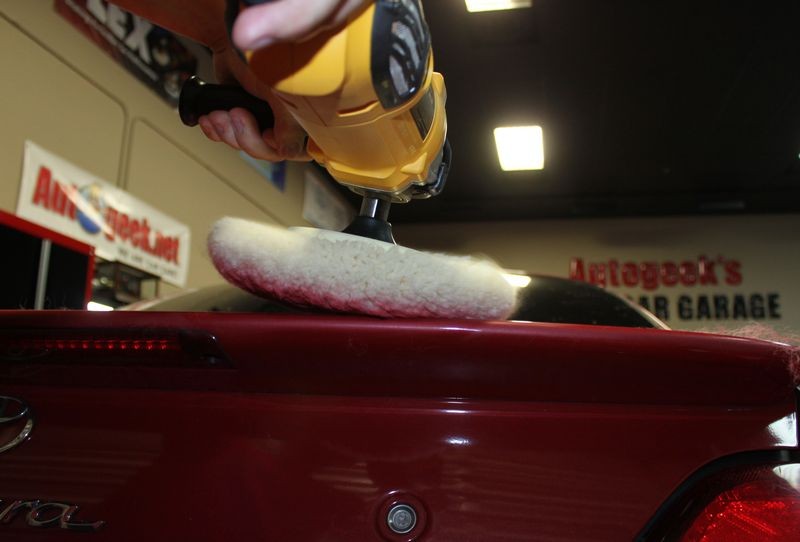
Why it's important to clean your pads often...
By Mike Phillips
When you're buffing out a car it's important to clean your pads often. By cleaning your pad often you will work faster and you will enable your pad and product to work more effectively. Be sure to have both clean terry cloth towels on hand and also a nylon pad cleaning brush. It's also a good idea to have plenty of pads so as a pad becomes wet with product you can switch over to a clean dry pad. Dry pads work better than wet pads.
ANYTIME you're abrading the surface whether you're using an aggressive cutting compound of an ultra fine polish, you have two things building up on the face of your buffing pad...
That's the whole idea behind cleaning your pad on the fly... you can remove a majority of the spent product and removed paint and then get back to running the buffer... buffing out an entire car already takes a l-o-n-g time... stopping to do some kind of pad cleaning procedure that isn't quick and easy keeps you from buffing on the paint.
Fast methods include,
Slow methods, (they might work well but they take you away from buffing on the car)
How to clean your pad with a nylon brush
Here's how to clean a pad with a nylon brush.
NOTE: you do this with the polisher turned OFF.

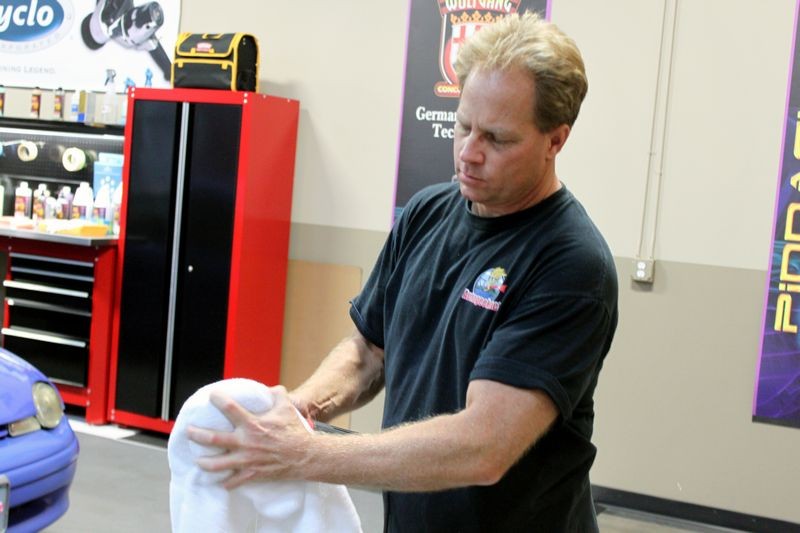
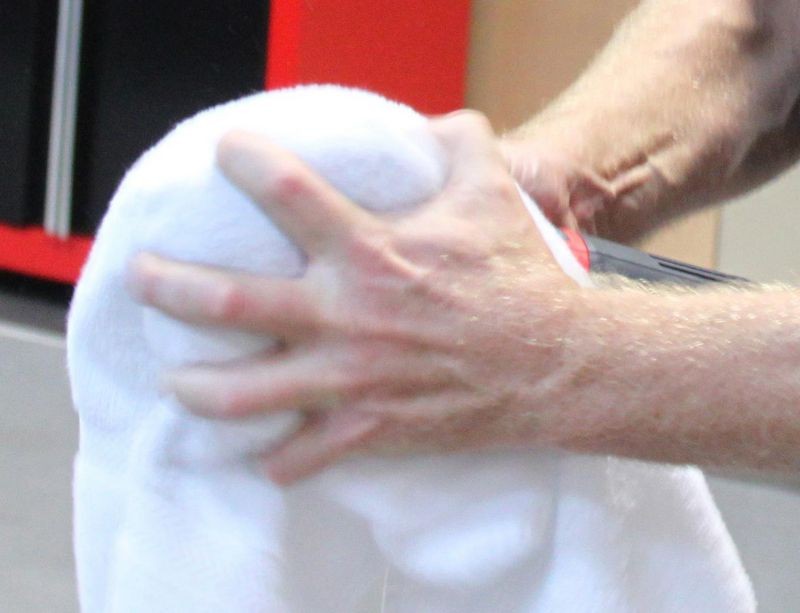
How to clean your pad on the fly using a terry cloth hand towel
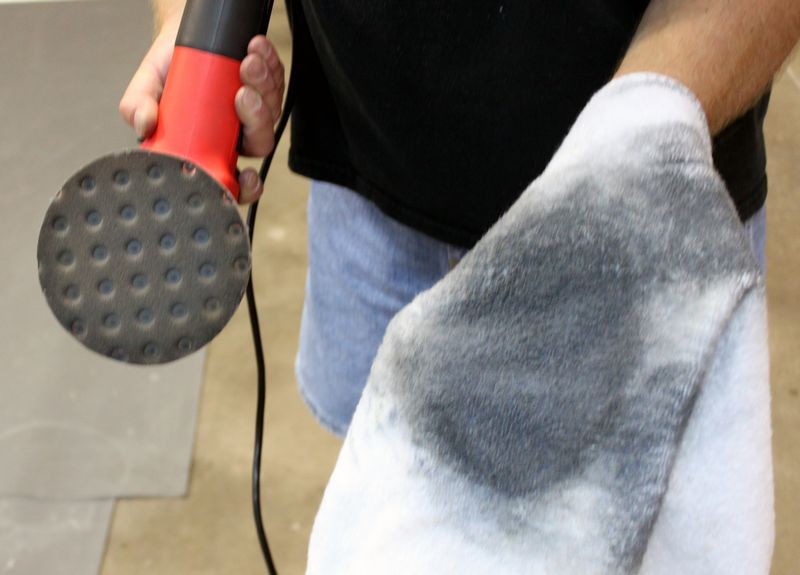
Cleaning your pad on the fly is where you take a terry cloth towel, usually a medium size hand towel works best, you fold it in two and then simply hold the towel against the face of the pad and then turn the polisher on and use your hand that�s holding the towel to push the towel into the foam. This will act to draw any excess liquid out of the foam and any excess residue off of the face of the pad.
This is me using the Clean your Pad on the Fly Technique to clean my pad on the fly as I'm working around a car buffing it out.

This video explains the above technique in detail and shows you exactly how to use this technique to clean your pads.
By Mike Phillips
When you're buffing out a car it's important to clean your pads often. By cleaning your pad often you will work faster and you will enable your pad and product to work more effectively. Be sure to have both clean terry cloth towels on hand and also a nylon pad cleaning brush. It's also a good idea to have plenty of pads so as a pad becomes wet with product you can switch over to a clean dry pad. Dry pads work better than wet pads.
ANYTIME you're abrading the surface whether you're using an aggressive cutting compound of an ultra fine polish, you have two things building up on the face of your buffing pad...
- Spent product
- Removed paint
- Adding fresh product to spent product and removed paint adulterates the fresh product, it also dilutes it.
- Buffing with a dirty pad will be more difficult.
- The product will cake-up on the face of the pad.
- The product will become gummy on the paint and hard to wipe off.
- You can scrub the face of the pad with a nylon brush like a pad conditioning brush or even a nylon toothbrush
- If using a Dual Action Polisher or a Rotary Buffer you can clean your pad on the fly with a terry cloth towel
- You can wash your pads in a bucket of water
- You can wash your pads in a sink under running water
- You can wash your pads in a pad washer
- You can switch to a clean, dry pad
- You can switch to a brand new pad
That's the whole idea behind cleaning your pad on the fly... you can remove a majority of the spent product and removed paint and then get back to running the buffer... buffing out an entire car already takes a l-o-n-g time... stopping to do some kind of pad cleaning procedure that isn't quick and easy keeps you from buffing on the paint.
Fast methods include,
- Pad Washers
- Cleaning your pad on the fly with a terry cloth towel
- Using a nylon pad conditioning brush
- Using a Spur if you're using a wool pad on a rotary buffer
Slow methods, (they might work well but they take you away from buffing on the car)
- You can wash your pads in a bucket of water
- You can wash your pads in a sink under running water
How to clean your pad with a nylon brush
Here's how to clean a pad with a nylon brush.
NOTE: you do this with the polisher turned OFF.
How to clean your pad on the fly using a terry cloth hand towel
Cleaning your pad on the fly is where you take a terry cloth towel, usually a medium size hand towel works best, you fold it in two and then simply hold the towel against the face of the pad and then turn the polisher on and use your hand that�s holding the towel to push the towel into the foam. This will act to draw any excess liquid out of the foam and any excess residue off of the face of the pad.
This is me using the Clean your Pad on the Fly Technique to clean my pad on the fly as I'm working around a car buffing it out.
This video explains the above technique in detail and shows you exactly how to use this technique to clean your pads.
How to clean your pad on the fly

